USB drives are convenient for storing and transferring data, but they are also prone to being lost or accessed by unauthorized individuals. Encrypting a USB drive is one of the most effective ways to safeguard your sensitive information. In this guide, we’ll walk you through the process of encrypting a USB drive on Windows 11/10 using BitLocker, a built-in encryption tool that ensures your data remains secure. Whether you’re concerned about losing your USB drive or simply want to prevent unauthorized access, BitLocker provides a powerful solution.
What is BitLocker Encryption?
Before diving into the steps, it’s important to understand BitLocker encryption. BitLocker is a full disk encryption feature available in certain versions of Windows, such as Windows 11 Pro, Windows 10 Pro, and Enterprise editions. BitLocker encrypts the entire drive, making it inaccessible without the proper password or recovery key. This encryption ensures that even if someone gains physical access to your USB drive, they won’t be able to read the data without the proper decryption credentials.
For more about securing your data, read our guide on How to Encrypt a Folder with a Password in Windows 11.
Why Use BitLocker to Encrypt a USB Drive?
Encryption is essential for protecting sensitive data. Here are some key reasons why you should consider using BitLocker to encrypt your USB drive:
- Prevent Unauthorized Access: If you lose your USB drive, encryption ensures that no one can access the data stored on it without the correct password or recovery key.
- Protect Personal Information: For people who store sensitive or personal files on their USB drive, encryption prevents unauthorized parties from accessing private information.
- Data Privacy Compliance: If you’re handling confidential work-related data, encrypting your USB drive helps you comply with privacy and data protection regulations.
How to Encrypt a USB Drive Using BitLocker on Windows 11/10
Step 1: Insert the USB Drive and Open File Explorer
First, insert the USB drive you want to encrypt into your computer. Then, open File Explorer (press Windows + E), and locate your USB drive in the list of available drives.
Step 2: Enable BitLocker
Once you’ve found the USB drive, right-click on the USB drive icon and select Turn on BitLocker from the context menu. This will open the BitLocker setup wizard.

Step 3: Choose a Password for Encryption
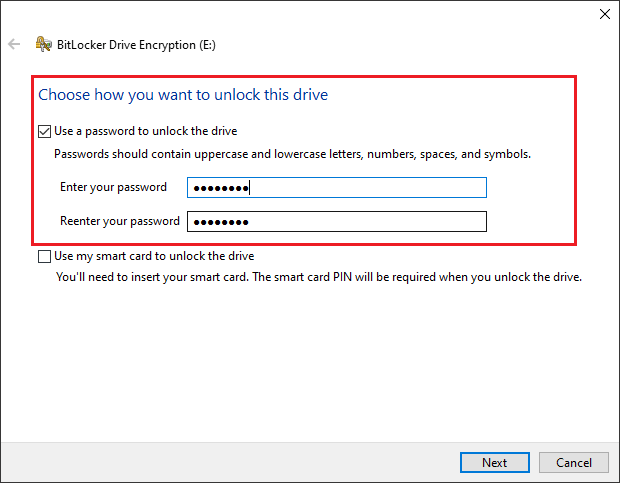
In the BitLocker setup wizard, you’ll be prompted to select a method to unlock the encrypted drive. Select the option Use a password to unlock the drive.
Enter a strong password—one that includes a mix of letters, numbers, and symbols. Confirm the password, and click Next. It’s important to choose a password that is both secure and memorable.

Step 4: Backup Your Recovery Key
BitLocker will ask you to back up your recovery key. This is crucial in case you forget your password. You can save the recovery key in one of the following ways:
- Save to a file: Store the recovery key in a secure location, like an encrypted cloud storage or a password manager.
- Print the recovery key: If you prefer a physical backup, you can print the recovery key and store it in a safe place.
- Save to a Microsoft account: If you have a Microsoft account linked to your computer, you can back up the recovery key online.
Choose your preferred backup method and click Next.

Step 5: Select the Encryption Method
BitLocker will then ask you whether you want to encrypt the entire USB drive or just the used space. For most users, it’s recommended to choose Encrypt the entire drive, especially if you plan to store sensitive files on the USB drive.
If you’re using the USB drive for regular file transfers and want a quicker encryption process, you may opt for Encrypt only used disk space. This option is faster, but it won’t encrypt any empty space on the drive.

Step 6: Start the Encryption Process
Once you’ve made your selection, click Start encrypting. Depending on the size of the USB drive, this process could take some time. Be patient and ensure that the USB drive remains connected during the entire process.

Step 7: Complete the Encryption
When the encryption process is complete, you’ll see a message saying BitLocker encryption is complete. At this point, your USB drive is fully encrypted and secure. You can now remove the drive and access it securely by entering your password when prompted.
Troubleshooting and Important Notes
- BitLocker Availability: BitLocker is not available on all versions of Windows. It’s only available on Windows 11 Pro, Windows 10 Pro, and Windows 10/11 Enterprise editions. If you’re using Windows Home, you won’t be able to use BitLocker without upgrading your edition.
- Encryption Time: Encryption time may vary depending on the size of your USB drive. For large-capacity drives, BitLocker encryption can take several hours. Make sure your USB drive is plugged in and that your computer does not go to sleep during the encryption process.
- Forgetting the Password: If you forget your BitLocker password and don’t have the recovery key, your data may become permanently inaccessible. Always make sure to back up your recovery key in a secure location.
Conclusion
Encrypting your USB drive using BitLocker is one of the most effective ways to protect your data from unauthorized access. By following the steps outlined in this guide, you can secure your files and ensure that your sensitive information remains private, even if your USB drive is lost or stolen. Remember to choose a strong password, back up your recovery key, and select the appropriate encryption settings for your needs.

